I went through a couple options for the title of this post, “Anything You Can Sell, I Can Sew Cheaper” inspired by Annie Get Your Gun but not, strictly speaking, true or “It’s Sew Cheap!”. I couldn’t decide just how cheesy was too cheesy so I went descriptive instead. Nonetheless. Now that our bedroom is done, or done enough, we’re switching gears to our study which will become our study\Reuben’s room. Some things are already in the works thanks to my dad’s free time this week. Before I tell you about that, I wanted to show any interested parties how I embellished our bedding for way less than Bed Bath and Beyond was charging.
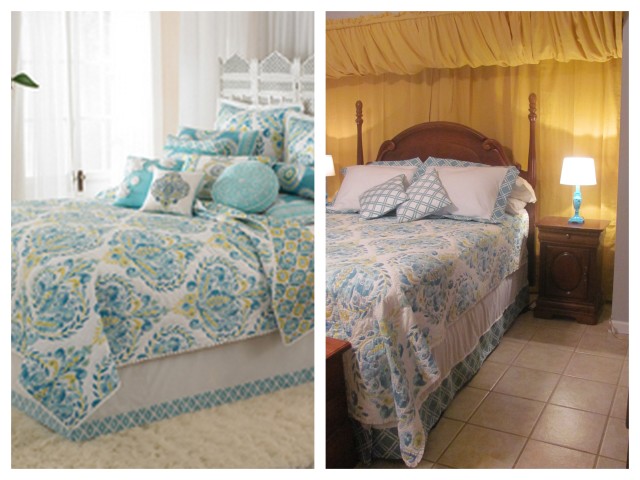
This is the quilt we bought from BB&B. I love all the accessories but they were way overpriced. We were even in a splurging kind of mood in the store, but just couldn’t bring ourselves to shell out $50 for a single throw pillow. I liked the look, but thought for sure I could ( with my mother’s help ) make it much cheaper.
Bed Skirt: $20 < $70
Our bed is up on 8 inch pedestals. We like the height and the extra storage space, but it means that traditional bed skirts are too short. This actually worked in our favor, however, when I set out to copy the BB&B bed skirt. I bought a $15 tailored white bed skirt from Target which had a length of 14 inches (Walmart and Target sell plain bed skirts, pillow shams and pillow cases, score!). The height from the floor to the top of our box spring was about 20 inches. I just needed to sew a 6 inch panel on the bottom of the finished skirt to get the look I wanted. Perfect!
I waited for Joann Craft Store to put their home decor fabric on sale, and lo! they finally did. I found this fabric for half off the half off price– $4 a yard. For my queen size bed I used under one yard total. The pattern was such that I could cut the width of the fabric. I cut three 7 inch wide strips– two for the long sides of the bed and one for the end of the bed. The 7 inches gave me seam allowances on top and bottom to have a finished panel of 6 1\8 inches. I cut the strips about one inch longer than the length of the sides to allow for end seams.
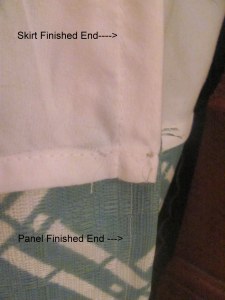
 Since a bed skirt isn’t going to be put through the washing machine or moved around too much, I didn’t worry about folding the raw edge under when I finished the bottom seam. I just flipped up 1\2 an inch and sewed it down. I did this for all three strips. My fabric was prone to raveling, so I did some trimming after I finished sewing, but it shouldn’t be a problem in the future now that it’s on the bed. I finished one side of the fabric, matching the 1\2 inch seam on the bed skirt, leaving the other unfinished. I’ll explain why in a moment.
 My idea was to attach the fabric panel by top stitching over the existing hem of the bed skirt. This would leave the hem showing with the fabric panel coming out from behind it. I laid the fabric right side up, under the hem of the skirt making sure 6 1/8 inches of fabric fell below the skirt. I lined up the finished side of my fabric with the finished side of the skirt and pinned all the way down. Both my fabric and the bed skirt had a little stretch to them. Even though I took my time stretching and pinning flat, I knew once I started sewing there would be a little give and the fabric would stretch out further than I pinned. As I sewed, I kept the fabric pulled tight, stopping every so often to double check I still had 6 1\8 inch of fabric out. As predicted, once I finished the whole length, the fabric stuck out further than the end seam of the skirt. Not a problem, since I left the end of the fabric unfinished. I folded the fabric under, matching the 1\2 inch seam on the bed skirt above and sewed it up. Easy peasy. I did this for the other two sides and was done!
In a childless world, I could have done this in a few hours time from cutting to finished, but that ain’t the world I live in, so it took about three days. Allowing for $4 of fabric, $15 for bed skirt and $1 for miscellaneous thread (which I didn’t have to use too much of) I made this skirt for $20. This was a very straight forward, basic skirt to do. There are a lot of variations that I could have done such has adding trim to the top of the bed skirt or on top of the panel, I could have used a bed skirt with a ruffle or kick pleats etc. I intentionally wanted the tailored look and it just so happened to be the easiest to do. Don’t you love it when life works out that way!


